We live in an era where our phones hold a huge chunk of our cherished memories and important data. We often realize the importance of this data after losing it to some software malfunction, broken screen, or maybe even theft. Apple provides its users with multiple options to back up their data, to make it as convenient as possible. We will be discussing one by one:
● Back Up iPhone with iCloud
● Back Up iPhone with iTunes
● Back Up iPhone with Google Drive
● Back Up iPhone with Dropbox App
● Back Up iPhone with Mac/Computer
Back Up iPhone with iCloud
This is one of the simplest ways to back up all your important information. Simply follow the steps below:
1. Once you are connected to the internet, go to “Settings”, and tap on your name.

2. Now tap on “iCloud”, and then tap on the “iCloud Backup” option.

3. In the next menu, switch the “iCloud Backup” to on. You can then tap the “Back Up Now” option to immediately start the backup procedure (make sure you are connected to some WiFi till the time process is completed).

You can confirm if your backup was successful. Go to Settings > Your name > iCloud > iCloud Backup.
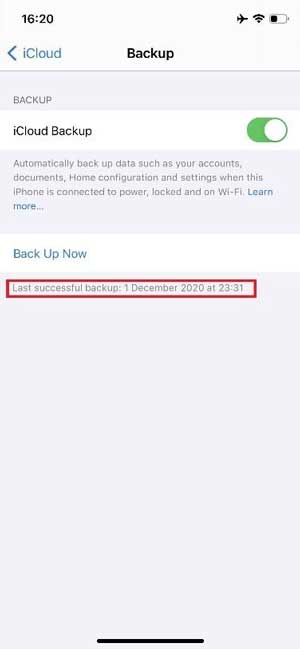
4. Here it is important to mention that iCloud offers only 5GB of free storage that can be used for backup. However, if you need more storage space, you can upgrade your storage plan to 50GB, 200GB, or 2TB. You can share your 200GB and 2TB plans with your family as well through “Family Sharing”.
Upgrading your iCloud Storage Plan can cost differently, depending on your region. We have mentioned some of these below (you can check for your region here).

Back Up iPhone with iTunes
What is iTunes?
iTunes is an online media store where you can organize and play your digital media collection on a computer and sync it across portable devices. However, iTunes also facilitates Apple users with the feature of backing up their data through iTunes.
Advantages of Backing Up Through iTunes
Backing up your data through iTunes can be a little tricky however, one of the advantages of using iTunes to back up your data is that it allows you to encrypt your data and protect it with a password as well. Also, backing up data on iTunes automatically backs up your data to iCloud.
How to Back Up with iTunes
To back up, your device through iTunes, install the latest version of iTunesand make sure that your system meets the minimum system requirements.

● Now run iTunes on your Mac/computer.

Now connect your iPhone via USB cable to your computer. To allow access to the iPhone, your phone might ask for the device’s passcode.

Once the device is connected to your computer, a mobile shaped icon will appear on the menu bar and your device’s name will appear in the left menu bar.

● Click on the mobile shaped icon to see the summary of your iPhone. Here you can back up your iPhone to iCloud or your computer. You can also have the option to encrypt your backup. Select the option of your choice and click “Back Up Now”.

This will initiate the backup process. You can see your backup progress in the progress bar.

● Once your backup is complete, you can see the latest backup details and your “Restore Backup” will become active again. This option can be used later to restore your backup data in case of any data loss.

Back Up iPhone with Google Drive
Google Drive is a cloud storage service that can be used to back up your contacts, photos, and calendars. Using Google Drive to backup your data is a good option, especially for users who keep switching between iOS and Android. If you are switching from Android to iOS, then you can use Google Drive to sync your data or vice versa.
To back up, your data on Google Drive, follow the steps below:
● Install the “Google Drive” app on your phone, open the “Google Drive” app, and log in using your Gmail account.

● Now click on the top left to open the menu, and from the menu, select the “Settings”. Here you can see that Google Drive provides you with 15GB of free storage space for cloud storage and you can purchase higher storage plans by tapping at “Buy Storage” option.

● In the next menu, tap on “Backup” and on the next page, you can select which data you want to be backed up and then tap on “Start Backup”. This will start your backup process.

Back Up iPhone with Dropbox App
Dropbox is another cloud storage service that is often used by users to share files. The alternate use of this app is to backup your important data. Dropbox provides its users with 2GB of free cloud storage however, you can buy storage plans up to 2TB.
Why Dropbox?
Dropbox is a home for all your most valuable files. To keep your files safe, Dropbox is designed with multiple layers of protection, distributed across a scalable, secure infrastructure. These layers of protection use 256-bit Advanced Encryption Standard (AES).
How to Back Up Using Dropbox?
● Install Dropbox on your iPhone and open the app. Log in if you already have an account or create a new account.

● Now tap the (+) sign at the center of the bottom menu and choose whether you want to “Upload Photos” or “Create or Upload Files”. Follow the pop-ups that follow, and your data will be uploaded to Dropbox and can be accessed whenever you want.

Back up iPhone with Mac / Computer
If you want to backup your iPhone to your Mac or computer, one way to execute this is through iTunes as already discussed above. However, if you are, for some reason, reluctant to use iTunes or find it too complex, you can use some other software that is available online as an alternative to iTunes.
Some of the software includes:
DearMob iPhone Manager
It is an all-in-one iTunes replacement that can be used for managing your content on iPhone through your Mac. This includes content like music, photos, videos, and backups along with data recovery.
Dr.Fone – Phone Backup (iOS)
Dr.Fone – Phone Backup supports both Windows and Mac and can be used to backup and restore your iPhone data. It also allows its users to preview, export, and restore any item from the backup to a device.
In the end, choosing how you want to back up your data is pretty much a personal decision depending on your requirement, budget, size of your data, and convenience. Most people opt for free options, however, if your storage requirement is high, going for a paid storage plan sounds like a good idea too.

