A phone can do a lot of things, making calls, playing games, taking notes, watching movies, etc. What you may not know is that your phone can even serve you as a portable scanner. In this article, we will look specifically into the iPhone and explain the easy way to scan documents and convert it to text.
Scan Documents with Apps Using iPhone
iPhone provides its users with two built-in scanner options. Moreover, numerous scanner apps can be downloaded from the App Store.
1. Scan Using Notes App in iPhone
iPhone recently integrated the "Scan" option in its Notes app which can easily help you scan any document and conveniently share it as a PDF.
Pros
● No special scanner app is required to scan documents which helps you save your mobile storage.
● You can easily add text before or after the scanned document.
● You can edit, crop, resize, add filters, and add or remove any scanned document in the Notes app.
● You can share any Note as PDF very conveniently.


Cons
● You must sync your Notes with iCloud in order to use the "Scan" feature.
● You cannot share Notes as Word or Text documents.
2. Scan Using Files in iPhone
Like in notes, you can also scan your documents using the Files app. Simply go to Files > iCloud Drive and at the top right corner, tap the three dots to open options from where you can select "Scan Documents". Once you have scanned your document, you can share it as a PDF with anyone you want.
Pros
● You can easily access any document scanned on your iPhone through any device having access to your iCloud like Mac, Windows, or any other iPhone.
● You can scan one or more pages of any document in one go and conveniently delete or add more pages without restarting the multi-page scan.
● You can easily edit, highlight, add a signature or crop the scanned document.
● The scanned page(s) automatically form a PDF document which can conveniently be shared.
Cons
● You must have an iCloud ID that is synced to Files.
● Unlike in the Notes app, here you cannot add text in the PDF document, however, you can add text on the scanned page like you add text on photos.
3. Using CamScanner to Scan on iPhone
CamScanner is a scanner app that is ranked No. 2 in productivity apps and has a rating of 4.7. It is developed by INTSIG Information Co., Ltd.
Feature
● Free mobile scanner.
● Users can optimize scan quality which can be achieved by smart cropping and auto enhancing features of the app.
● Also allows its users to E-sign the scanned or PDF document.
● OCR (optical character recognition) feature allows users to extract text from a page (feature available only in paid version).

Pros
● Allows you to share the scanned pictures as PDF, JPEG, or text file (text file only in the paid app).
● You can scan and share any document via email, or social media directly from the app.
● You can add customized watermarks on documents.
● You can instantly print out docs with a nearby printer via AirPrint.
● It allows access to "Student benefits" if you sign in using your Student ID (might not be available/ applicable for all students) which allows you access to some of the premium features.

Cons
● The biggest drawback of CamScanner is that most of its features are available only in the paid app which costs 4.99 USD/month or 49.99 USD/year.
● Unlike Notes app or Files, CamScanner does not sync with your iCloud.
● To use its supported third-party storage services like Google Drive, Evernote, Dropbox, or OneDrive, the user must have a premium app.
● In the free version, all your scanned pages will have a CamScanner watermark.
4. Using Adobe Scan to Scan on iPhone
Adobe Scan was developed by Adobe Inc., and it is ranked number 23 in business apps with a rating of 4.7. It is a free scanner app that provides users with automatic text recognition (OCR) as well.
Features
● Allows users to save scans as JPEG.
● Allows you to copy text from a scanned document.
● You can remove imperfections from your document using Adobe Scan.
● It allows you to resize, crop, apply filters, rotate, and collage your scans.
● It also allows its users to convert any image in "Photos" into a PDF document.
Pros
● OCR is available in 19 most commonly spoken languages which covers the needs of most of the population around the world.
● As it is a product of Adobe Inc., so it can be used very conveniently with other Adobe products like Adobe Reader.
● Adobe allows its user to save documents in Adobe Cloud free of cost.
● Adobe has a single layout from which you can capture a single scan or multiple scans and you can choose when to stop.
● Adobe Scan's Auto Color feature retains the color and contrast very accurately
● Adobe's Fill & Sign feature allows you to scan a form and then export to Adobe Reader app where you can check the boxes, sign with your finger, or fill the fields.
Cons
● Adobe Scan's default storage option is Adobe Cloud while you can individually upload scans to other storage clouds like Google Drive, however, default storage will always be Adobe Cloud.
● Adobe Scan's upload to cloud option is not optional, which means that every scan you make is automatically uploaded to Adobe Cloud. This is a serious concern for users who don't want their scans to be uploaded on servers.
● Although Adobe Scan does have the option to send scans as JPEG, or PDF, there is no option of sharing files as Word or TXT file.
5. Using Microsoft Office Lens to Scan Documents
It is a free scanner app with OCR for automatic text recognition. It was developed by Microsoft Corporation and it is ranked 87 in productivity apps with a ranking of 4.7.
Features
● Capture and crop pictures on whiteboard and blackboard and cleans up glare and shadows.
● Allows you to trim and color images accurately using Document Mode.
● Scanned documents and pictures can be saved on OneDrive, OneNote, or any other cloud storage.
● Allows you to extract contact information from a business card and save it in your contacts or OneNote.
Pros
● Allows you to share documents in Word as well.
● Microsoft Lens recognizes contact info when a business card is scanned and can save it in contacts.
● Using its "whiteboard mode", you can generate PowerPoint Slides as well.
● Provides its users with four different scan options i.e., Document, Whiteboard, Photo, and Business Card.
● Automatically recognizes text using OCR in any Word or PDF.
Cons
● To export a document in .docx, u need to download Microsoft Word as well.
● Office Lens' scans are not as clean or as bright as Adobe Scan.
● Office Lens does not provide its users with the option to automatically upload scans to other cloud storage services.
● Filters in Office Lens are not very good if you want to get rid of the shadows.
How to Convert PDF to Text on iPhone?
Converting a PDF document to text or some editable form is a need that often pops up especially in a work environment. Few dedicated apps can convert a PDF into a TXT or Word file and there are also some shortcuts you can opt for if you only want to copy some part of a document.
1. Converting PDF to Text Using Microsoft Office Lens
Office Lens provides its users with automatic text recognition using OCR. This feature is very useful if you want to copy some text from PDF. Just follow the steps below:
● Simply open the PDF document and take a screenshot of the part you want to copy.
● Now open Office Lens and at the bottom left corner, tap on the "Media" option.
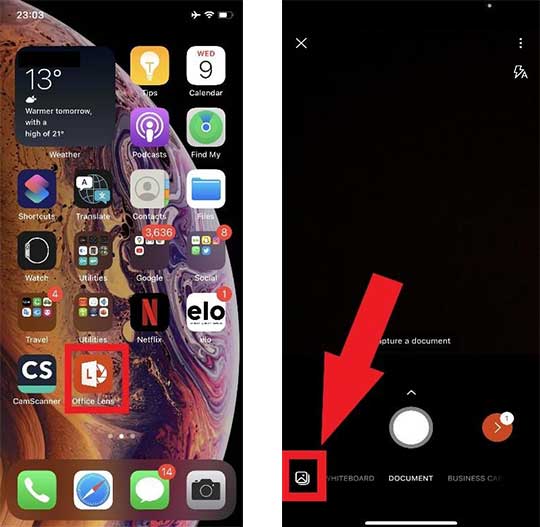
● Select the screenshot you just took and tap “Next”. In the next menu, if you edit the screenshot as per your requirement or simply tap "Done" to move to the next menu.

● Here you will see the "Export to" menu. In this menu, tap "Immersive Reader".

● This will convert all the content in your image file into text. Now you can copy this text and use it however you want.

2. Using PDFelement App to Convert PDF to Text
PDFelement is an app developed by Wondershare Technology Group Co., Ltd, and it helps users read, edit, convert, and sign PDF files using your iPhone. To convert any PDF to Word, Text, RTF, or any other format, just follow the steps below:
● Download PDFelement and launch it from your home screen.
● At the left top of your screen, tap at the three lines to launch the option from which you can select the folder where your PDF document is placed.
● In front of the PDF document's name, tap at the three dots which will open the options menu, select "Convert".
● In the next menu, select the format you want to convert your PDF into and tap "Start".

3. Converting PDF to Text Using Google Translate
Although this is not the purpose for which Google Translate is designed, however for quick conversion of PDF to text, this app can also be used.
● Open the PDF and screenshot the part you want to copy or convert to text.
● Launch Google Translate and tap on the camera-shaped icon. This will launch your camera. At the bottom right corner, you have the option to browse an image from your Photos. Select the screenshot of the PDF.
● Now the app will scan the image and highlight all the text detected. From the highlighted text, select the text you want and it will immediately get converted to text.
● Copy this text and use it.

